mus

Monday, July 25, 2011

Birthday Fun!

 We've had lots of Birthday fun lately. I have a few pictures I wanted to post about some crafts I did.

Here is a ruffle cake that I made for my sisters birthday. It turned out awesome. I added vintage buttons to it to give it some flare! Not too bad for my first time using this technique.


Next thing I made was a picture frame accessory holder for my sister Sara. I got an old rustic frame and covered the back with chicken wire. Beware if you use chicken wire it's rather sharp. I cut my fingers and leg about 10 times and had blood everywhere! ha! Then I got a wooden letter S, painted it white, made some rosettes to put in the corners. I made a double fabric rosette for the top of the frame so that it was a bigger one. The rosettes you see on the frame are attached by twine. I hot glued a piece of twine on the back of the rosettes so that she can reposition them if she wants to. Here are pictures. 


Here is another one I made for my best friend Jlall as a birthday gift too. Hers was made with red because that color will always remind me of her! Hers turned out great. I did all of the same steps with this one as well. Then my bff Ang got adorable earrings that she placed on the frame too as part of her gift. What a unique gift.


And now for Charlie Bear: He turned 6. We had a mini birthday party here for him. Charlie got a toy for his birthday & some popcorn of course, his favorite. His new toy is piggie and it makes a pig sound too when you squeeze him. It's more of a grunt then a squeal. I think it's hilarious and Brian hates it. Well Charlie & Jersey are obsessed with the piggie. Dee however has about 0% interest in the thing. But here are some pics of Charlie on his birthday with his piggie and siblings!


haha I placed it there!


The piggie made it in all of the pictures! Its the new favorite toy around here. 
Happy Birthday Charlie Bear, we LOVE you!

Startin' Fresh!

Hey guys! It's been over a week since I've posted anything. I slowly am getting better and not in as much pain anymore with my ear! Still can't hear, but what's new!


I've got lots to post about! First I cut my hair! Eeeee! I needed a change and I could not stand my hair any longer. It was pretty much stripper long according to my sister. ha! So I cut over 6inches off! I LOVE IT! Here is a picture of my hubs and I at the Royals game!


We have been working hard around our house lately. I feel as though we still have SO much more to do, especially before I head back to teaching. Booo!! I'm not even ready yet. I've been enjoying staying up late, sleeping in, watching tv, and blog stalking! :)

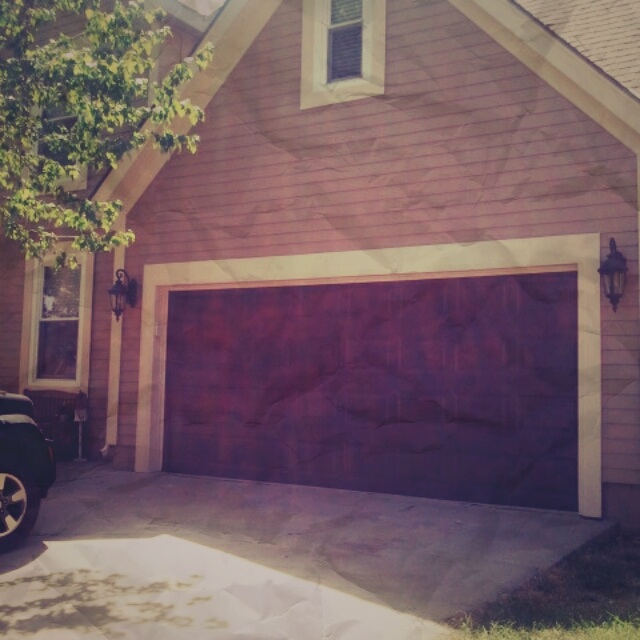
I mentioned that we got our house painted. The crew is done painting so I wanted to show you a few pictures of the house. We are still trying to do lots on the outside of our house like creating a brick flower bed/wall thingy, brick walkway on the side of our house, extending our patio by creating a paver patio. Ohhh the list could go on and on. My lovely husband hates lists and its no secret I'm obsessed with lists and most importantly I LOVE crossing things off the list. Ahhh such a great feeling!

Brian & I had a tough time picking out colors for the house. We wanted something different. Our house was previously a light light tan color with the traditional white trim and red shutters. BLAH! Vomit! Yup I hated it and my house really looked like a trash hole. Not really, but to me it was pretty awful. We had a lot of damage on our siding from the storms, wood rot, etc. etc. So anyways all that is fixed, and it looks grrrreat!

Oh wait how could I forget I had our insurance come out to look at our damage and they pulled part of our trim above our window off so it created a hole. A nice little hole for a birds nest that had several baby birdies in there. It felt like the birds lived in my dining room. Sick! The crew fixed that too so no more birdies in the dining room, yay!

And I had this sweet basketball goal on my house when I moved in 5 years ago. It became a running joke and a land mark for people to find my house. I would say to people my house is on the right hand side and it has a sweet basketball goal on the front of the house, you can't miss it!! Behind the goal there was another birds nest that was seriously there for 5 years. Every spring we had baby birdies. It was annoying and several baby birdies died from falling out of the nest & several baby birdies ended up hopping in our garage. I'm an animal lover but it really got annoying would I had to throw several baby birds in the trash and scurry them out of our garage. Sooooo it was a huge MOMENT when the crew tore down our basketball on our house. RIP Basketball goal, you will NOT be missed! :)

Last but not least "BOB the Builder" Ohhhh Bob the builder! Who is bob the builder? Well 5 years ago when my best friend in the whole wide world, Angie lived with me, she would randomly get woken up at 5am by Bob the builder. Bob was a squirrel that liked to build things in our attic in the early morning! So annoying. We set many traps, squirrel bait, mini bombs, and still couldn't kill him! We boarded up the hole he was getting in several times but the dang thing managed to bite his little way through it every time. Well the crew said they were going to try something different and cover up the entry. I just told them to do whatever they needed to do before I borrowed my friends BB gun and shot Bob the builder myself! I wish bob was gone or dead but he is now trapped in our house, oh geeze, I hope he dies soon from a heat stroke! I really am not this mean but it's BOB's time to go to squirrel heaven!

Whew! See we had many things wrong with our house and now it's ALL fixed. What a great feeling. Okay so Brian and I wanted a different color for the house. Something different and something that stood out. We have a gray house next to us and a poop colored green house on the other side of us. So we wanted to really make our house pop & stand out!


We spent over $50.00 in samples trying to find the right color. Brian & I made many trips up to Home Depot to pick out the right color. It was quite frustrating and we felt rushed. I didn't even get all the pictures of the colors we put on our house to test it out. Our whole porch area was covered in samples! Ha!! You see the orange. I came home and Brian put that on the shed and I was like WHAT? He said, "baby your favorite color is orange right?" HA! So that color was a joke!  Finally our last visit to Home Depot we picked our last color combo and it was a WINNER!

Anyways we decided with a light mocha color, with a creamy trim, and dark dark brown for our accent color. We love it. Ahhh.....It looks amazing. We also decided against shutters. We also of course got all new light fixtures, numbers for the house, door fixtures, new doorbell etc. It looks great and certainly gives it that pop we wanted! Here it is:


Our new doorbell and door fixture. Ohhh the little things in life. Actually that thing was EXspensive. 
So I guess it deserves its own picture! :)
Here is our back porch. Still needing some decorating help but I will be working on that sooner than later! 

Also here is a little craft I did. Brian was so kind and brought these stumps home from the farm. He ended up carving a lot of stumps for the wedding but these ones were blank ones. I wanted to create a little stump bench for our front porch. I found this wood head board at Hobby Lobby on clearance for $14.00. I placed the stumps in front of it. Added 3 little pots of flowers and a bird house! How cute! I love it. I am sure I will add more things to our front porch, but it's a start! 


Here are some other pictures of the inside of our house right now. We again still have LOTS to do but here is a little glimpse in the Shields household!

Entryway!

Office

Office

Dining Room: My wedding bouquets are hanging from the door knobs on our hutch. So fun! This is my old kitchen table that we put in the dining room for now. We moved Brian's dining room table in our kitchen and I am in the process of refinishing an old vintage farm table for this dining room! 
Don't look in the corners of this room, those are wedding piles! :)


 Yup it's a burlap table runner. It actually is one of my dads coffee bags from the warehouse. Stay tuned for burlap pillows, curtains, ohhhh and even a burlap rug for our porch! I LOVE burlap! :)

Family Room!

Alright that's it for now, this are all the things that we have been working on, Startin' Fresh! :)

Saturday, July 16, 2011

Pain Pain Go Away!

I am not one to really complain or be negative. But I have this awful ear infection! The good news is I have to boast about my wonderful husband and amazing Mama & Pops. They have really taken care of me the past few days. Literally 12 days ago my little sis dunked me in the pool and I got water in my ear. It stayed in my ear and created this nasty infection. Long story but it got so bad I finally went to the doctor. 5 medicines, 3 trips to the doctors, 3 trips to the pharmacy and two wicks that were placed in my ear later I got to go home yesterday and rest. The pain was so bad and the swelling from my swollen shut ear cannal spread to the side of my face which caused some sort of Melanoma ear condition. Ha! CRAZY! My doctor said I could win a prize for how horrible this infection was. He was so impressed he invited nurses in to my room to take a peak at my nasty ear. :( I just chuckled and said please give me medicine, STRONG medicine! He was extremely worried and wanted to hospitalize me if my fever and swelling didn't go down. Who would of thought that this was all due to my sister dunking me in the pool. THANKS LITTLE SARA! I'm never going swimming again.

Anways my sweet husband has already taken action being the EMT he is. This morning I woke up to him taking my tempurature over me, haha kinda of creepy but more sweet than anything! And he brought me my 10 medicine bottles and breakfast. My mom was my official Taxi driver today because I can't drive with these meds, they are so strong! I am on the road to recovery THANK GOODNESS! Most of you that know me know it's REALLY hard for me to relax. I'm constantly on the go. Last night Brian got mad at me cause I wanted to clean out and re organized our pantry! ha! I did a quick clean out before I realized I needed to lay down! He was right.

So the point in me telling you this is that it's been a huge set back. I have a million things and crafts I would much rather be doing than resting! I only have a few more weeks before this teacher heads back to school.

Tomorrow Brian and I will be picking out new exterior paint for our house to get painted. We also have had some other repairs around the house. We are going to go get new fixtures for the outside of our house as well. EEEEKKK! I can't wait to post pics. I am also going to repaint some of our outdoor furniture and of course get some new pretty flowers! I will post pictures tomorrow of the progress of our house. This week it should be done.

I'm really ready for my dogs to stop barking at the workers cause it's really driving me nuts and hurting my poor ear! Stay tuned for pictures! Yipeeeeeee

Tuesday, July 12, 2011

Wedding Pictures Take 2!

Due to our crazy/unexpected/bad weather/microburst of a wedding day Brian and I were not able to take very many pictures the day of our wedding. The day of our wedding pictures were to start at 2:30 on the dot. Formal pictures that is. Well due to us having a whirlwind of a day we had to postpone pictures. Our photographer again might I add was so wonderful and just easy going. Our formal pictures literally for the brides side started at 6:20 and the wedding was at 7. Haha. So much for relaxing. It was so fun though. Our wonderful crew of friends and family were still running around at 6pm with Brian and I trying to set up. We were all drenched in sweat might I add. By the grace of God everything was into place the exact minute it needed to be! Really, it was a miracle! Even our hair stylists were running around crazy with us! Love them! So needless to say Brian and I did not get many pictures the day of our wedding. We are doing our pictures tomorrow morning with our photographer. Woohooo.

The good news is we are doing it out at the farm where we got married. Which means we were smart and left a lot of our props out in the barn for our photoshoot! Tomorrow will be a wrap for the Shields wedding. Eeeek..... Can't wait to see these pictures and can't wait to share them with all of you!!

Monday, July 11, 2011

Crafts!

Hey all! Sorry I haven't blogged in awhile. The Mr. & I are trying to still consolidate 2 households. It's a never ending process. Lots of cleaning, organizing, laundry, crafting, painting and refinishing furniture! Whew! We have been in the process of refinishing a dresser for our closet. I can't wait to post pictures. I hope to get this in the closet tomorrow! Woohoo. i do need to still get new hardware for the all the drawers. My mother and I have been working hard on a new dinning room set for our house. I did remember to take pictures of what it looked liked before. The table top needs lots of sanding and we have had to place this crazy gel/paint thinner on top of it to get that old old lead paint off. So it's really been quite the process. Not to mention the table & chair legs have tons of little spindels on them so it's really taken a long time to sand these puppies down. Brian helped us the other day by removing all the old seats. We will have to make some repairs to the wood before we recover them in new fabric! Sometimes I am so impatient and I just want this table to be done. Only because you will all DIE when you see it. EEEkkk it's going to be adorable. I cannot wait to get it done and reveal the pictures! Woohoo!

Since I can't post any pictures yet of those projects I am going to post 2 projects right now. My little sis SarBear recently graduated college so we had a huge celebration tonight at the farm with all our family. We've been dying to give her her present. Brian & I have been planning on this for awhile now. I came up with the idea back in May. However, I needed to use part of her present (an old window pane) for our wedding first. hehe. We used all these old vintage windows that Brian painted and distressed for our wedding. We hung them by twine from all the trees. It was beautiful! We loved how they turned out! :)

I got this idea to make her a weekly scheduler with an old window pane. Brian already had eye hooks on all the windows so it was perfect. What I did was get a window pane that had 6 sections. I was going to use each section for a day of the week & then Saturday & Sunday could share a section. I already had chalk board paint that we used for the wedding and I painted one side of the window with the chalk paint. I had to do 6 coats for it to be thick enough. I then outlined each section with 2 rows of twine via hotglue (burnt myself really bad too). I purchased small wood letters at hobby lobby for each day of the week. I then chalked part of the top of the window for the month. On either sides of that section I made gray rosettes. This is the other craft I will blog about and show you how to do. I then tied ribbon through the eye hooks and tied a bow. TADA! Sorry for the quick explanation. Here are the pictures:


The next craft project I will blog real quick about are rosettes. Aw I love them. I actually ordered one million from Etsy for our wedding and I attached them all over to anywhere and anything to give an extra vintage feel. I really wanted to make a million myself for our wedding but it was one of those things I just did not have time for. It was less stress for me to just purchase a ton. I found a great seller that sold them for an extremely reasonable price so it really was worth it in the end.

 I used these gray rosettes that I made for Sara's Graduation gift. They are the gray rosettes you see next to the month in the pictures above. I will tell you very briefly how to make them. They literally take maybe 1 minute to make, I KID YOU NOT! 

All you need is: a 3ft long piece of fabric that is about 2.5 inches wide & a hot glue gun. Easy enough? Oh yes easy enough!

 My sister in law is making burlap ones that are sooooo stinkin' cute. I am going to start attempting burlap ones soon. These rosettes you can literally attach to anything & everything. I have made them into headbands, clips for your hair, added accesory for Sara's weekly calendar & my sister in law attached them to a purse she made. Oh yes and I attached them onto twine and then put them on all the blue glassed mason jars for our wedding. You see some in the above pictures. We used all the blue glass mason jars for part of our center pieces, I will be blogging soon about the million & one wedding crafts we did. 

The options really are ENDLESS for these rosettes! And I'm obsessed! Here is how you make them:

1. Cut a piece of fabric that is about 3 ft long & 2.5 inches wide. As you can see my picture below my cutting job is really trashy. BUT hey it doesn't matter that's the great thing. ha! Once you cut the piece of fabric, you are going to take one end and tie a knot. I did a double knot on mine & I didn't make it extremely tight. 

2. Next you need to straighten out the loose end of the fabric. I folded mine in half.

3. The knot is going to be your center. So you are going to take the fabric closest to the knot and wrap it around the knot. You will then use your hot glue gun to add dots of glue. I suggest gluing atleast twice for everytime you wrap the fabric around a complete rotation. The key to wrapping it around the knot is taking the fabric and folding it up/crossing it over and glueing it to the sides of the flower. You have to cross the fabric up and over. You do not want the flower to be loose or really tight, just attached the fabric with glue well enough so that it feels sturdy. 

4. You will continue to wrap the entire piece of fabric around the knot. You will need to glue about 2 times per rotation around, just so that the fabric is constantly sticking to the knot.

5. Once you get done you will have a little tail left over on the back from the other short end side of the knot. What I did was glue it down on the back. This time I did not need to place a backing on the back of my rosette I just glued it onto the weekly calendar I made. Although, if you were making a hair clip I would suggest cutting a round piece of felt to the back and then attaching a clip or pin of some sort. 
(This pictures is of the back of the rosette.)

6. Here is the finished project. LOVE, LOVE, LOVE Rosettes. The good news is they are so easy and literally take one minute to make! 


Happy Monday! Much Love from the Shields household! 

Sunday, July 3, 2011

Wedding Pictures are HERE!


Hey All! Guess what....... AHHHHHHH the pictures are uploaded, the pictures are uploaded! Brian & I could not be more pleased with how they turned out. Simply AMAZING. I'm slightly obsessed. Our great friends Tim & Jodi Fleenor did our pictures. Words can't express how outstanding they were to work with and they did a stunning job at taking pictures of literally ONE of the craziest days of our life. I'm not really ready to blog about the SHIELDS WEDDING MADNESS, someday I will. I think I'm still exhausted from that day. ha! Let's just say everything that could EVER possibly go wrong at a wedding, went wrong at our wedding. BUT... here's the good part it was PERFECT and I mean that with all my heart. I would not change a thing about it. It was amazing & really the best day of our lives. So much laughter and stories to remember from this day. Our great families will not forget it & ESPECIALLY our bridal party! HA, love you ALL! Here are a few pictures to hold you over! Thanks Tim & Jodi Fleenor we love you! 


Back to cleaning I go. I really need to kick it in gear so my sweet husband 
has some closet space to hang his clothes! :)